RSS

Monthly Archives: November 2015

Demy from Italy

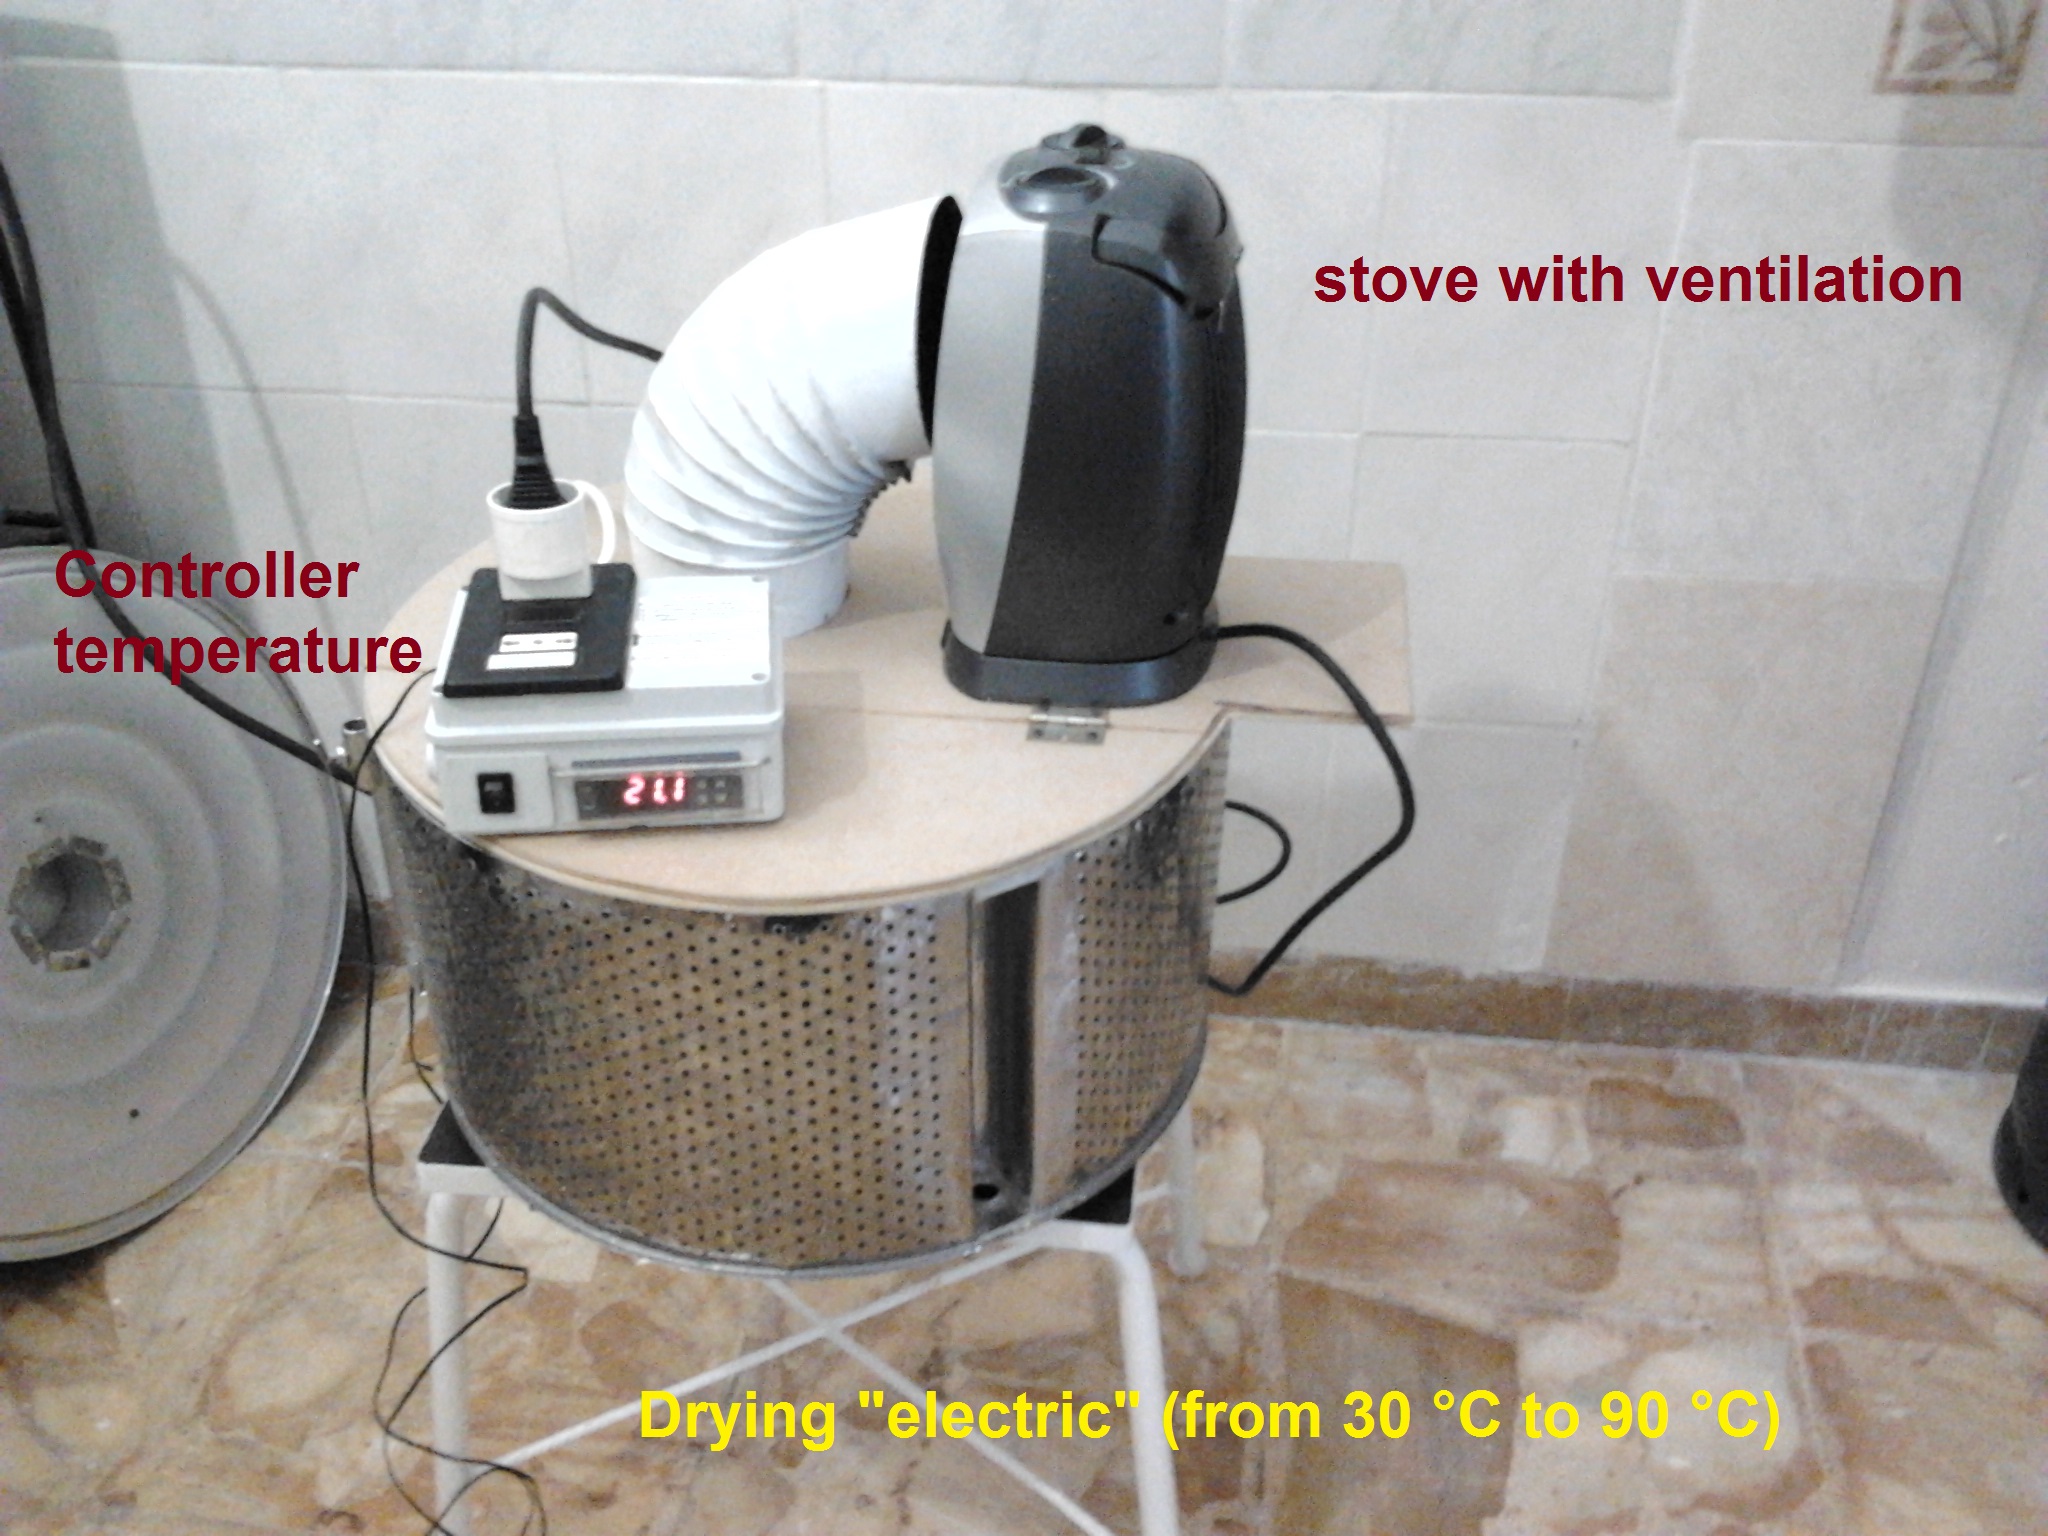
Check out this operation in Motta San Giovanni, that’s at the toe of the boot of Italy. Demy’s always asking me great questions which I really appreciate because it forces me to dig deeper into my textbooks to find the answers. He recently asked me what the difference was between Aromatic malt and Honey malt, something I’ve been wondering myself. This has led me to my latest bunch of experiments which I will post about soon. His set up utilizes a stainless steel drum which came out of a washing machine, but as you can see makes an ideal germination and kilning vessel. I’m really envious of his roasting oven and drum which looks like the perfect size for roasting small batches of grain.

Demy’s started brewing 5 years ago and quickly jumped into all-grain brewing “ I moved  to the “all-grain” because it is full, you work with the raw materials, their scents, colors ..for more satisfaction.” In an area where even home brewing is a novelty it’s pretty amazing that he has taken his hobby to this level in the pursuit of better beer, hat’s off to you buddy! In his words “Malting is really gratifying: we get to understand the chemical process, you can smell the scents of roasting, caramelizing, and build the equipment with your own hands.” I couldn’t agree more.

“My equipment is still to be improved but some progress l ‘I did: mixer to mash and controllers for malting and mash. Stumenti are economic, assembled by myself and give a big advantage: they allow the automatic temperature control. The first is called stc1000 (available on the internet) is a thermostat and allows you to adjust both the heat and cold (-50 ° C + 90 ° C) can be used for various things: mash, cell fermentation, fridge etc. I use it Also in ‘drying malt. L ‘another controller is a more sophisticated form PID (always cheap, available on the internet) I use both in the mash is in the oven because of the malt can control very high temperatures.”

Demy’s has also started growing hops and is planning on brewing some locally grown chestnut beers. Thanks for sharing Demy, Salute!


9 8 4 7 6 5 13 12 3 14 2 1 11 10


6 Comments

Posted by on November 30, 2015 in Home growers and maltsters


New Malt Kiln

This project was way overdue, maybe a few years overdue, but I finally built something to kiln in besides my oven. As I stated in the video using the oven just became too inconvenient. My wife also makes custom order cakes and she’s been getting more orders lately so I had to free up the oven.

So far I’ve only done one small batch of Brumalt in it and I was impressed by how well it worked. The temperature stayed consistent and with only two vent holes open the heat stayed in and there was plenty of airflow. I didn’t even turn the fan on and I think I might only have to when I’m doing larger batches over 5 lbs. This small 2.5lb batch of  brumalt dried within 6 hours which is quite fast and it was so nice to have it stew for 18 hours without having to worry about someone turning the oven on accidentally (which has happened).

One thing I might add is something to disperse the heat when I’m using screens. The hot plate sits in the center of the kiln and it seems that the heat is more concentrated in the center although I haven’t measured this yet. I’m not concerned when the perforated steel tray is in there because these holes give an open area of 40% so the tray itself seems to disperse the heat well enough. I may just add a spare piece of the tray material under the screen to disperse the heat.

I don’t have any carpentry experience so I’m sure there are better ways to build a box but here are the dimensions that I used.  The front and back are 24″ by 24″  The sides are 20″ by 24″  Because I’m using 3/4 ” plywood the top and bottom dimensions are 20″ by 25 1/2″.  It’s held together with 1 1/2 ” drywall screws with a little bit of wood glue. The 6 vent holes are 1 1/2 ” which I used a hole cutter bit on my drill to cut out. I pre-drilled some holes for the vent covers and then on the on the covers themselves I drilled holes wide enough to accommodate the 1 1/4″ screws so the covers could move without releasing the screw from the main lid. I had the cutting done at the Home Depot because it takes them a few seconds to get a perfectly straight cut. The piano hinge is also from the Home Depot. For the fan hole I used a jigsaw to cut a round hole and it’s not pretty, luckily it’s covered up by the fan. 


4 Comments

Posted by on November 20, 2015 in Hop Oast / Malt Kiln, Malt kilns


Tags: , , , , , , ,

 
Imbuepalate.com

To Inspire and Permeate through Chefs, My Kitchen, and Adventures in Food, Drink and Exploration.

Threefrenchs: A Fermented Exploration

Booze, Travel & Food (and maybe a few surprises)

The Meandering Meadery

Cultivating fermented food and drinks one jar at a time

Brülosophy

They Who Drink Beer Will Think Beer

Untitled RSS Feed

Growing, malting and brewing beer

Creative Brewing

by Scott Ickes

A Brewer's Wife

Law librarian, brewer's wife and mom of three girls (not necessarily in that order)

From Plants to Beer

The real route of beer

My Own Home Brew

My record and experience in brewing

Romping & Nguyening

Romping around the world and Nguyening since March 2014.

Brewing Beer The Hard Way

Growing, malting and brewing beer

Five Blades Brewing

F' Everything, We're Doing Five Blades

The ATL Beer Guy

This Guy Knows Beer -- Also visit www.pouranotherpint.com

East Happyland Homebrew Garden Louisiana

Gardening hops, grains, vegetables, and brewing beer in South Louisiana. And they said it couldn't be done....

The Apartment Homebrewer

Brewing small batches of craft beer in a 650 sqft apartment

Bishop's Beer Blog

Just another WordPress.com site

The Quest for Edelstoff

Making Liquid Bread

Home Bruin

The homebrewing adventures of a Boston sports fan